Northern Women's Chokers
by Terry Bousquet
originally
published as CIHA Indian Craft Series No. 1014
I will just give you some easy directions on how to make a choker for a northern women’s outfit.
MATERIALS NEEDED:
- Hair pipes
a. bone or composition - dentallium shells
- harness leather
- beads
a. brass
b. glass - buckskin
- concha shell
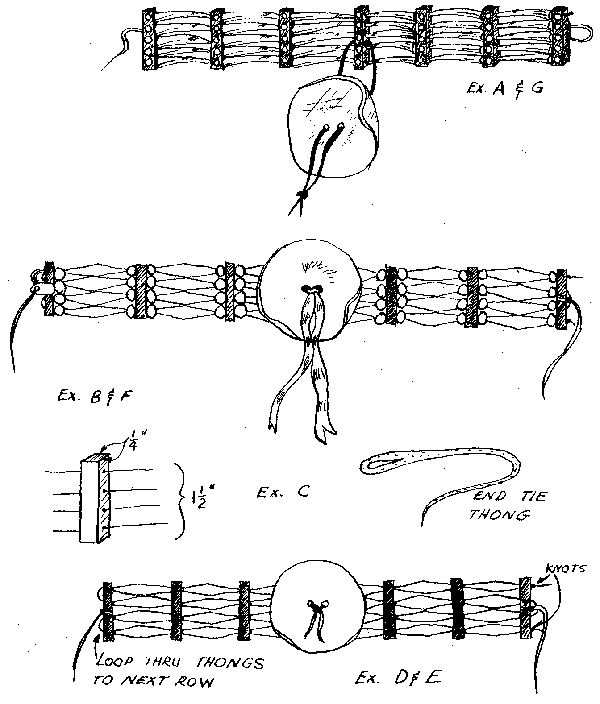
I have found the easiest way to put together the choker, is lay out your leather pieces and hair pipes (or dentallium shells) in the order that you will be putting the choker together. (Example A) The most common amount of rows in a choker is 4 rows. You can go up or down from there depending on how the choker will fit you. What I did was try someone else's choker on, just to see how it would fit and went from there. The choker should just meet in the back of your neck, where it will be tied with some buckskin.
Now you are ready to put your choker together. Cut your harness leather into ¼" wide strips. Then you measure out about 7, 1½” long pieces. These are your spaces between hair pipes (or dentallium shells) and beads. (Example B)
I have 48 brass beads in my choker. This will give you a start on about how many you will need.
Now you need to put the holes in your leather pieces. The rough side of the leather will be facing out. I lay my hair pipes (or dentallium shells) next to the leather piece and mark approximately where the hole in the hair pipe (or dentallium shell) will meet the leather strip. Then you just mark all the rest of the strips and take an awl and put the holes in the leather. (example C) Cut your buckskin in long thongs. You want them thin enough to go through your hair pipes, (heavy duty thread for dentallium shells) but strong-enough so they won’t break.
Lay your choker out the way you are going to put it together. Start threading the buckskin (or thread) through the hair pipes (or dentallium) and the beads and the leather strips. (Example D)
When you get down to the end, put the buckskin through the next hole and go through the next row. This way you will only have your knots at one end. (Example E) Get another piece of buckskin (or thread) and do the same thing with the next two rows. Tie off your buckskin (or thread) with a good strong over hand knot. Trim off the excess leather as close to the knot as you possibly can.
To finish up your choker, take some buckskin and put a piece on each end of the choker. (Example F) These will be your ties. Put your concha shell on the center of the choker (example G) and use a piece of buckskin and tie it onto the choker. I let the excess leather hang down. I usually leave it about 3” or 4” long.
Now your choker is completed. Hope to see you make another one real soon.
We carry all the supplies you need for this craft project. Here are some quick links:
Bone Hairpipe
Plastic Hairpipe
Awl
Leather Spacers - For cutting your own spacers
Pre-punched Choker Spacers
Buckskin Thong
Scrap Buckskin - For cutting your own thong
French Brass Beads
Czech Glass Crow Beads
Pink Conch Shells
Abalone
Conch Shells
Copyright © California Indian Hobbyist Association & Terry Bousquet
Copyright © 2003-2019 Matoska Trading Company Inc