Two-Ribbon Bindings
by Jerry Smith
originally
published as CIHA Indian Craft Series No. 1006
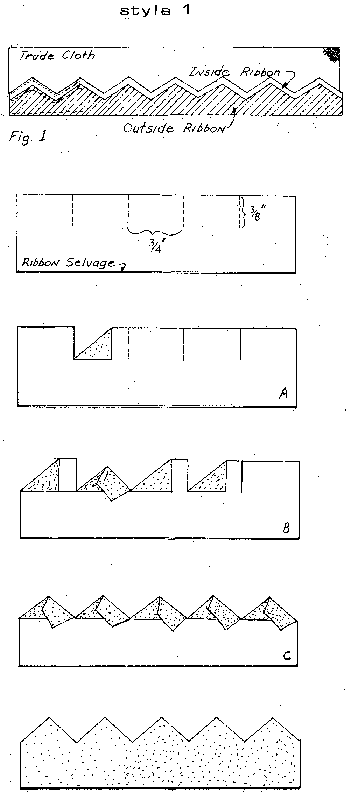
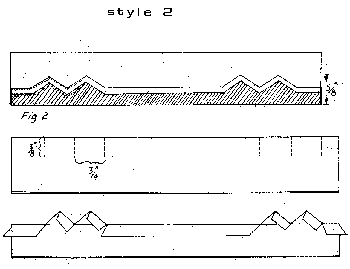
The cut edges of several items made of “trade cloth” or backed with trade cloth are often bound with a decorative two-ribbon binding (Fig. 1 & 2) rather than with a single straight ribbon binding. Such two-ribbon bindings are found on the rims of otter caps, blankets, gourd dance blankets, aprons, bustle trailers, otter draggers, straight dance trailers and straight dance legging bottoms. The method below will produce very fine results when using rayon taffeta ribbon; adjustments must be made when using a substitute such as taffeta.
COLORS: Always use two contrasting colors such as; red and white; red and turquoise; red and yellow, purple and lt. yellow, purple and lt. green, pink and green, maroon and lt. blue, etc.
QUANTITY: Purchase enough rayon taffeta ribbon in each color to bind half the length to be bound. Buy thread to match each color.
TECHNIQUE
Step 1: Cut each ribbon in half, length wise down the center.
Step 2: Cut a series of 3/4” apart and 3/8” deep slits in the darker ribbon as indicated either for style #1 or #2 in the diagram. Uniform depth and width of cuts is extremely important for quality results.
Step 3: Fold peaks into darker outside ribbon as shown in diagrams A, B, and C, using finger nails. It is important first fold of each peak (A) be over half way to prevent raveling. An iron may be used after all folds have been made for a final crease.
Step 4: Sew cut and folded darker outside ribbon to inside ribbon along folded edge. Use a small stitch about 16 per inch.
Step 5: Cut and fold the lighter colored inside ribbon with folded darker ribbon sewn on as in A, B, and C of diagram This ribbon is cut and folded second to conveniently match up peaks and valleys of each ribbon
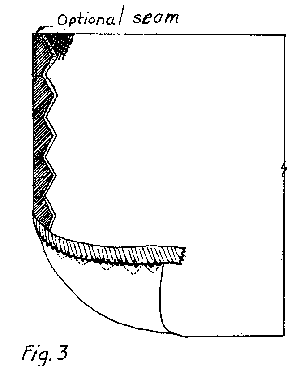
Step 6: Sew pair of ribbons to trade cloth or wool cloth. The peaks of the design should be 5/8” from the edge of the trade cloth. Now, cut off excess inside ribbon to meet flush with edge if the cloth. Sew second (optional) straight seam as in Fig. 3.
Step 7: Fold outer ribbon over to form an actual binding and hand sew to back side of cloth with whip stitch.
Practice on an 8” strip of cloth will increase the quality of the final effort.
Pattern, Straight Dance Suit
Copyright © California Indian Hobbyist Association & Jerry Smith
Copyright © 2003-2019 Matoska Trading Company Inc