The Porcupine & Porcupine Quillwork
by Pat Hartless
publication date unknown
The North American porcupine is a rodent Genus Erethizon that spends a good deal of its life in trees stripping off the outer bark to expose the cambrium layer which he eats. Many trees are killed outright each year due to the amount of bark removed and from insects and disease attacking the wound made by the porcupine.
The range of the porcupine is from Alaska south through Canada, the Great Lakes region, parts of the Northeastern United States, the Rocky Mountains and the Pacific Coast states. In California, the porcupine is found in the higher mountains as far south as the southern extreme of the Sierra Nevadas.
The quill of the porcupine is white with a dark tip, upwards of five inches in length and one-eighth inch in diameter. The quill is found among the long guard hair and the shorter under-fur. The size of the quills varies with their location in the porcupine’s body, the longer thicker quills being found on the tail, with the quills becoming more delicate toward the head and under-belly.
Long before the white man came to this country, porcupine quills were used as a decorating material, but the white man brought the glass bead with him which was quickly adopted for decorating leather articles, alone or in conjunction with porcupine quills.
At the present time, porcupine quillwork is almost, but not quite, a lost art whereas beadwork is still being made for sale or for personal use by many Indians, beads being easier to work with at the sacrifice of the unmatchable beauty of quillwork.
Porcupine quills were removed from the porcupine and sorted as to size and dyed various colors before being used. Pre white man colors used by the Sioux to dye quills were limited to red, yellow, black and shades thereof. These colors were obtained from various plants and boiled in water with the quills. The length of time the quills were left in the boiling solution determined the shade of color obtained. The dye present in the first cloth traded to the Indian was not as stable as dye found in cloth today, and the Indian found that by backing this cloth with porcupine quills, the quills would become the same color as the cloth. In later years the traders supplied aniline dyes which took the place of the materials formerly used as aniline dyes are easier to use and offer a wider selection of brighter colors.
Before being used, the quills were washed well as they were generally held in the worker’s mouth as they were being used. The warmth and moisture of saliva would soften the quills and make them more pliable than if they were soaked in water. When dry, the quills become hard and firm.
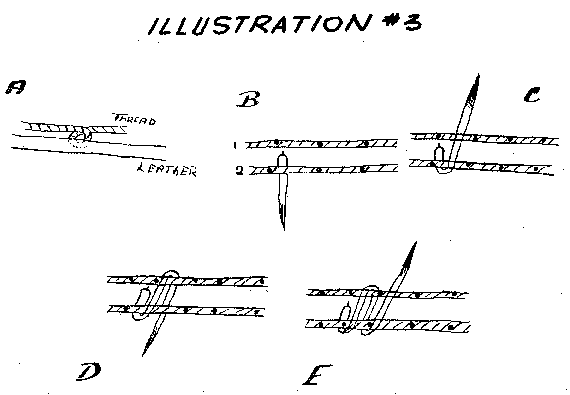
The basic techniques used in fastening the quills to the article to be decorated are sewing, wrapping and plaiting. In sewing the quills are fastened to the object to be decorated by commercial threads or formerly by threads of sinew. Two threads are used, which are fastened down in narrow parallel rows, the quills passing over the tops and under the bottom of the threads in a manner which will allow the sides of the quill to touch, but not overlap, with additional quills being laid in place as needed. The base of the new quill is laid under the tip of the old quill.
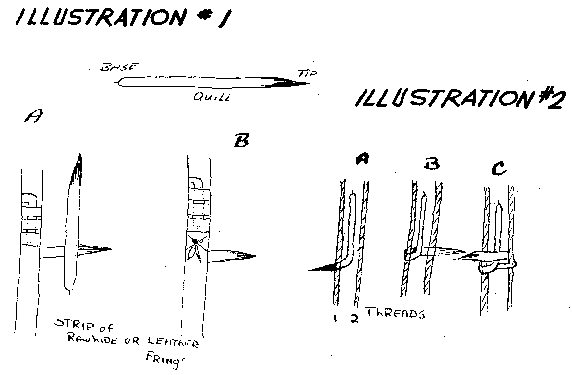
Wrapping is the method commonly employed in applying quills to the quilled section of fringe on Sioux pipe bags, breastplates and wherever a decoration is wanted on free-hanging fringe such as on shirts or leggings. With this technique, the base of the quill is laid parallel to the fringe on the back side of the fringe and wrapped around the fringe in a spiraling manner from top to bottom, with the sides of the quill touching but not overlapping. Additional quills are added by twisting the tip of the old quill and the bottom of the new quill together against the fringe pointing toward the bottom of the fringe. A turn of the new quill a round the joined portion of quills will hold them securely in place. This quilling technique is repeated until the fringe is covered to the length desired, at which time the tip of the last quill is bent up and tucked under a couple of wraps of quills.
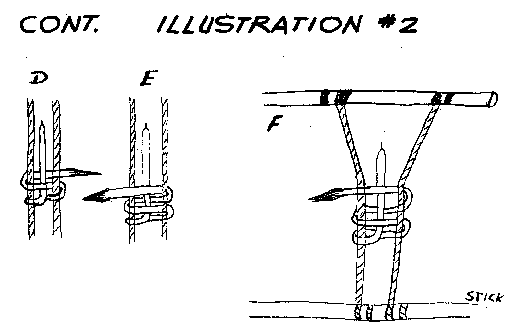
in plaiting quills, two threads are suspended horizontally in a parallel position. The quill is wrapped around the threads in a figure 8 pattern progressing from one end of the threads toward the other end, with the threads being the center of the 0’s in the figure eight. The ends of the quills, both and old ones and the ones being added, are tucked inside of wrappings of quills and against the threads. If care is taken, it is not readily apparent where the new quills are added. After the entire piece of plaiting is finished, it is then wrapped around the article to be decorated. Plaiting is used on pipestems, quirt handles, horn spoon handles and other round or oval objects.
With all methods of quilling, the color of the quill used will determine the design form.
A technique often employed by the white novice aspiring to become a craftsman is to cut the base of the quill off and insert the tip of one quill into the base of another, creating a continuous column of quills of any length desired. This column is wrapped around the strips of rawhide needed in constructing breastplates, armbands, etc. Although this is the easiest and fastest method of connecting quills, it is also a method that is incorrect because it was never used by the Indians.
WRAPPING
Illustration 1:
- The base of a quill layed on a fringe of
leather or strip of rawhide, the method of anchoring the base of the quill
with several wraps of the body of the quill, and the base of the second
quill layed over the tip of the first quill prior to twisting the two
quills together.
- Shows the quills twisted together and the tip of the second quill as it is to be wrapped over the twisted section of both quills to anchor them to the strip being quilled. This technique is continued, additional quills being added as needed until the strip is covered with quills, at which time the top of the last quill is pointed toward the top of the strip and passed under several wraps of quills which will hold the tip in place. Quills should always be added on the back side of the strip which will cause the quilling on the front side of the strip to be smooth.

PLAITING
Illustration 2:
- Two parallel threads with the base of a quill laid between them.
- The quill going behind thread 1 and in front of thread 2.
- The quill going behind thread 2 and in front of the quill base and in front of thread 1.
- The quill going behind thread 1, the base of the quill and in front of thread 2.
- The quill going behind thread 2, in front of the base of the quill and in front of thread 1.
- Shows the method of tying the bottom of the threads close together and to a stick, and the tops of the threads further apart, also to a stick. The sticks are suspended far enough apart to cause tension on the threads. Pulling out and downward on the quill as it is worked between the threads will pull the threads together and cover them with the quills. To add additional quills, the base of the second quill is placed between the threads and alongside the tip of the first quill and the process A - E is repeated. To finish, the tip of the last quil1 is passed between the threads and under the last several wraps of quill and pulled tight.

SEWING
Illustration 3:
- Method of attaching thread to leather.
- Two parallel threads attached to leather and the base of a quill laid on the leather and under thread 2.
- Shows the quill being bent across both threads and,
- The quill going under both threads
- Shows the quill going across both threads. This process is continued until the quill is too short to go over both threads again, at which time the tip of the quill is left under the thread and the base of the next quill is laid under the tip of the last quill. Steps B - E is repeated until a section of quillwork of the desired length is completed.
In illustration 3, the dots on the threads represent the points at which the threads are attached to the leather. By putting many sections of quillwork together, a large article of leather can be completely covered with quills.
Originally, threads of sinew were used when necessary to attach the quills to the material, but cotton thread is usually used today with all quilling techniques. By using quills of different colors, the design is created. After attaching the quills by the wrapping or sewing method, rub the surface of the quills with a smooth object such as the bowl of a spoon or a platter to achieve a good surface.

Copyright © Pat Hartless
Copyright © 2003-2019 Matoska Trading Company Inc